Controlling your SD‑WAN traffic using QoS
Your organization can take advantage of seven standard traffic classes and customize how your enterprise and applications map into these traffic classes for Lumen® SD‑WAN with Versa Networks service. In this use case we review the standard traffic classes (called QoS profiles), recommend the default mapping into those classes, and show how you can edit a QoS policy (and rule) to define application level matching within these standard classes. We also offer use cases for web traffic, voice traffic, and URL filtering.
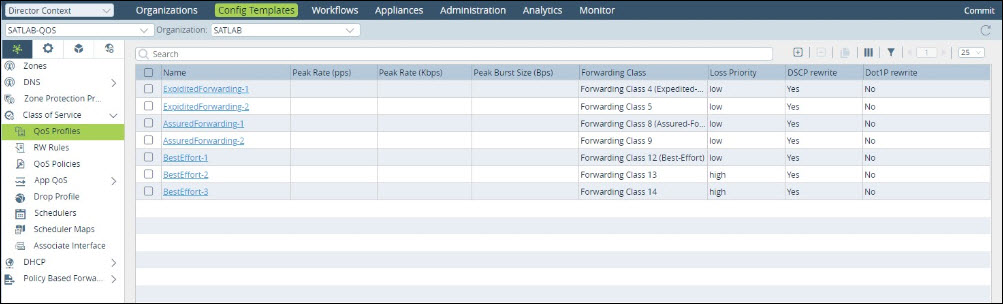
Lumen sets up and deploys the following seven QoS profiles for your organization’s class of service.
Profile name | Recommended use | Forwarding class | Traffic class |
| ExpiditedForwarding‑1 ExpiditedForwarding‑2 | Voice Video Conferencing | FC4 FC5 | Premium+ Premium |
| AssuredForwarding‑1 AssuredForwarding‑2 | Priority Apps Business Apps | FC8 FC9 | Enhanded+ Enhanced |
| BestEffort‑1 BestEffort‑2 BestEffort‑3 | Low Priority Apps Internet Local Guest Internet | FC12 FC13 FC14 | Basic+ Basic Basic |
To review QoS profiles:
- Log in to the SD-WAN portal.
- In the Director Context, click the Config Templates tab.
- Select the template you want to review QoS for. QoS profiles may be defined on its own template, which is called a service template. Lumen creates your template and names it: [your organization’s name]‑QoS.
- In the Networking tab, select Class of Service > QoS > Profiles.
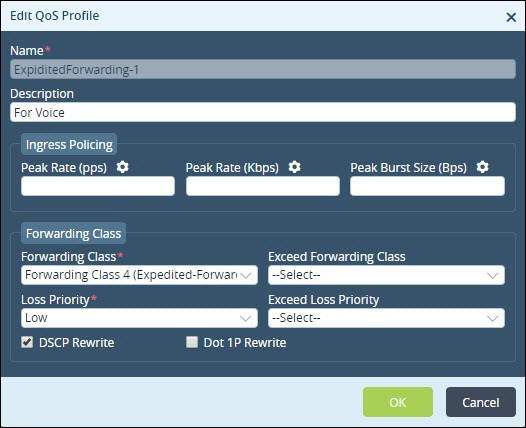
- To view how a profile is mapped to a forwarding class, click on the profile name.
Note: Lumen recommends your organization does not create additional profiles or edit the forwarding classes or settings for the default profiles without a custom design review. To schedule a custom design review, contact your Lumen representative.
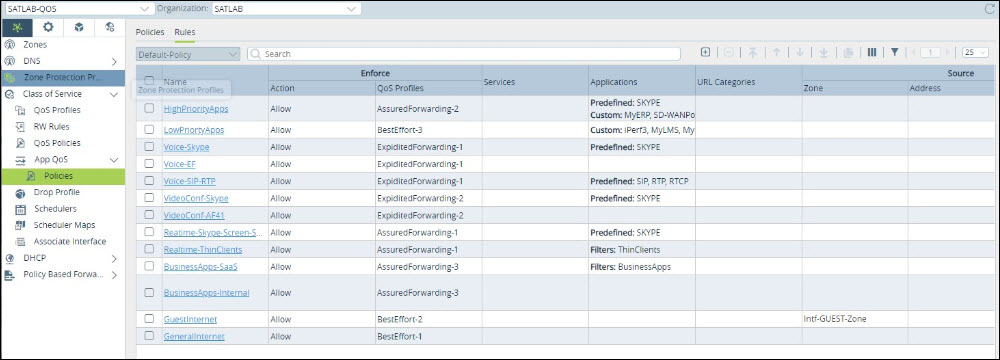
Lumen uses the application identification functionality to identify most of your organization’s traffic and assigns it to the appropriate traffic class. In addition, Lumen uses differentiated services code point (DSCP) values and zones to define traffic into the appropriate traffic class.
The table below shows samples of how your traffic is matched to the forwarding classes.
QoS profile | Rule | Match criteria examples |
ExpiditedForwarding‑1 | Voice | DSCP: EF (46) and/or SIP/RTP and/or Voice Zone |
ExpiditedForwarding‑2 | Video Conferencing | DSCP: AF41 (34) |
AssuredForwarding‑1 | Priority Apps | Application Filter: Thin Clients |
AssuredForwarding‑2 | Business Apps | Office 365 Apps: Destination IP: 10.0.0.0/8, 172.16.0.0/12, 192.168.0.0/16 |
BestEffort‑1 | Low Priority Apps | Application Filter: App/OS Updaters: Destination IP address: xxxxxx/xxx |
BestEffort‑2 | Internet | All Else |
BestEffort‑3 | Local Guest Internet | Source Zone: Guest |
Note: Lumen names the rule either Voice or GuestInternet. Look for the appropriate name to monitor and view analytics for the rule.
You can take the following steps to edit a rule using the SD‑WAN app QoS feature. Rules are executed in priority order with the highest (or first) rule at the top and the lowest (or last) rule at the bottom. You can move rules by selecting them and moving them up or down the list.
An app QoS policy (called the default‑policy) was created by Lumen during the onboarding process. You can have only one QoS policy, but you can edit the rules for that policy by following the instructions below.
To configure app QoS policies and rules:
- Log in to the SD-WAN portal.
- In the Director Context, click the Config Templates tab, select a template.
- In the Networking tab, select Class of Service > App QoS > Policies > Rules.
- From the Organization list, select an entity.
- Select the checkbox next to an existing rule to edit.
- In our example, we will edit Voice-SIP-RTP.
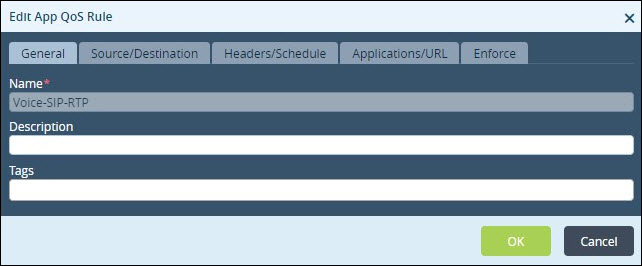
- Click the Applications/URL tab to review/edit the applications that are matched to this rule.
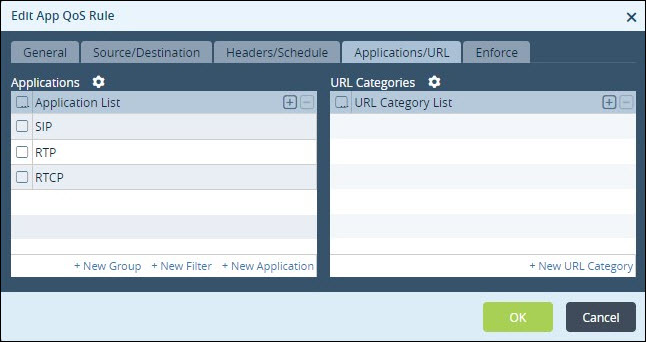
- To add a new application, click + and select the application from the list. You can also define a new custom application by selecting the New Application selection.
- Click OK.
Apply these changes to your branches.
- Click Commit (in the upper-right corner of the portal).
- From the Select Template list, select the related branches to commit either the new SD-WAN rule or all rules. We recommend you commit a template to just one branch to test your new rule before applying it to all the branches related to your template.
- In the View column, click the icon to preview changes.
- Click OK.


