Configuring a premise-based node
For Lumen® SASE Solutions, you can configure a premise-based node using Lumen Connect®. To avoid delays or failure configuring the node, make sure the information you enter is accurate and that the contacts are correct. We use this information to complete your order. You can also configure nodes using Lumen hosted gateways and virtual instance nodes.
Note: If you're configuring a node for Lumen SASE with Fortinet and using FortiSwitches with High Availability, we recommend coordinating with your Lumen SASE engineer to confirm that all necessary accessories are included to help ensure a smooth deployment.
To configure a premise-based node:
- Using the left menu, click Services, click Service Tools & Portals, then click SASE Management.
Lumen Connect shows details about your service: configured SASE nodes (with a status for each), information about your technology provider, notifications (if any) related to your SASE service, etc.
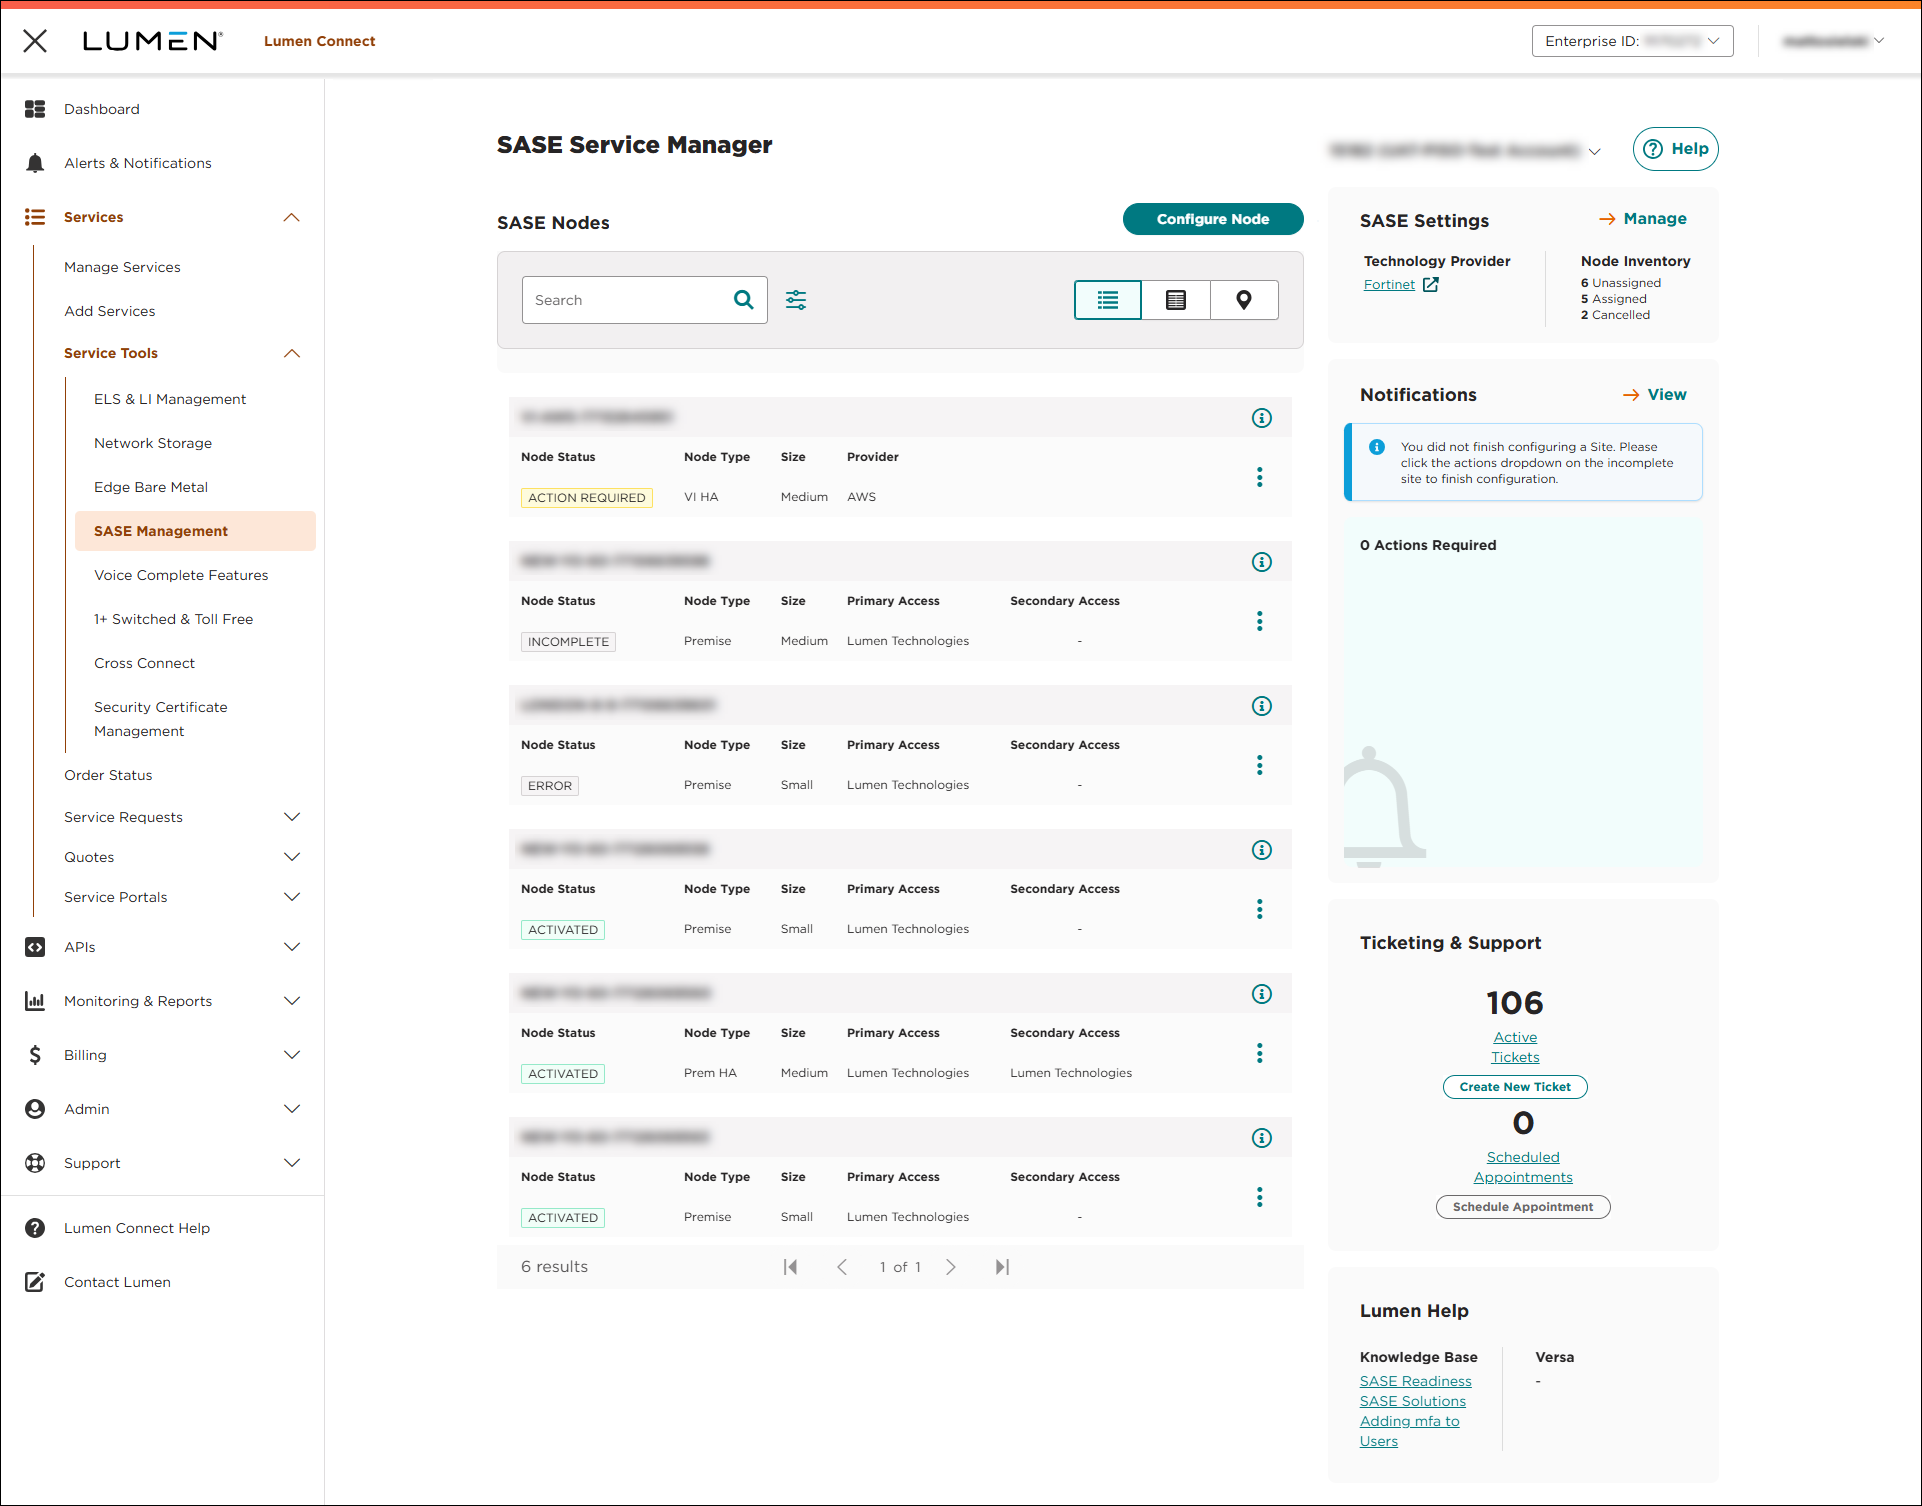
- In the SASE Nodes section, click Configure Node.
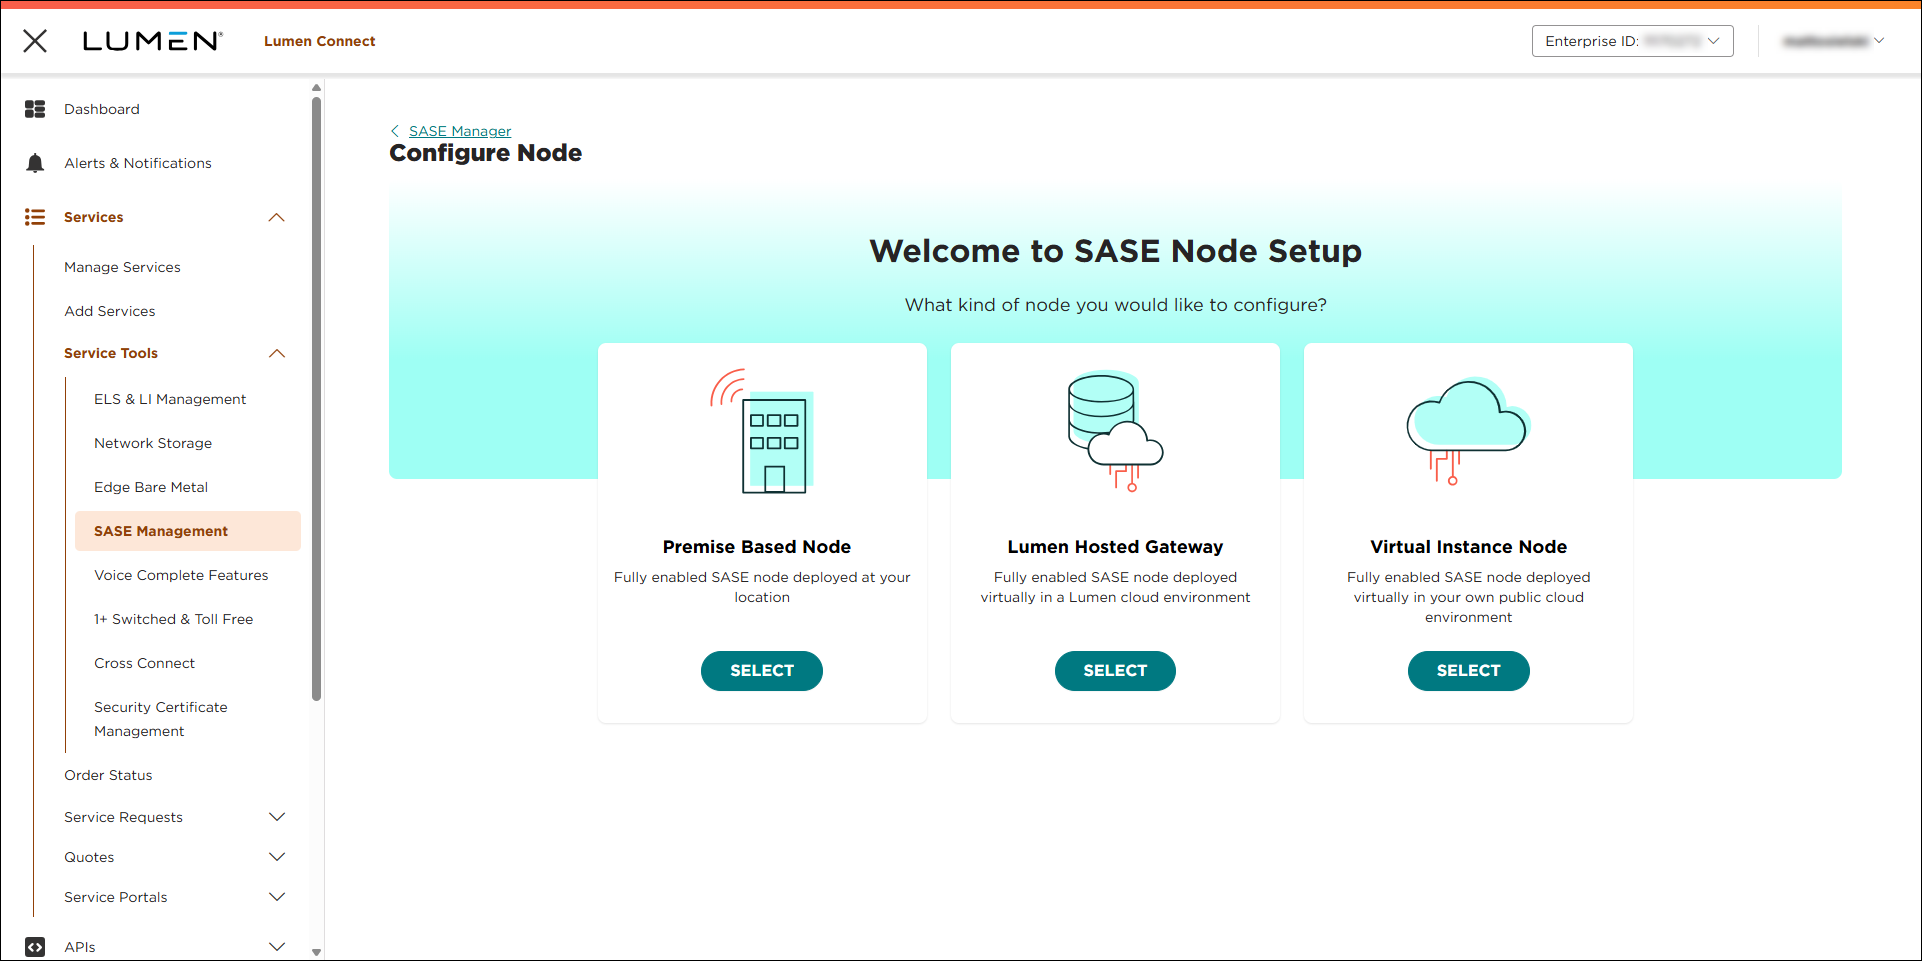
- On the Premise Based Node card, click SELECT.
Lumen Connect shows locations with available nodes. On each row, Lumen Connect also lists the size of the node and whether high availability or on-site install are available.
- Select the radio button for the Lumen location (and size) you want to use, then click Continue.
- Verify the details for the node:
- whether the node includes on-site installation
- whether the node includes a high-availability device for your service (High availability means you'll have two devices at the location: one primary, one backup.)
- the type of node you're configuring: hub, spoke, or mesh
- whether the node includes on-site installation
- Select whether you need a rack mount for the device.
- When you're done, click Save & Continue.
- Verify the address where you want the node delivered, then use the fields to tell us where you want the node installed at that address. Fill in building details such as floor, suite, or room.
- If you want Lumen to ship the device to a different location (e.g., if this location is not secure or is under construction), clear the Same as Site Address checkbox, then tell us where you want us to ship the device. Otherwise, leave the Same as Site Address checkbox selected and we'll ship the device to this location.
- When you're done, click Save & Continue.
Lumen Connect lists the service ID and a suggested nickanme for the node.
- Choose whether to use the system-generated nickname for the node or to customize it. To customize the nickname, click the icon, then type a nickname (up to 11 characters) to make it easier to identify in your list of nodes (e.g., Store-1405). When you're done, click Save & Continue.
Lumen Connect lists the WAN configuration information for the node based on the location you selected (and the information available for that location).
- In the WAN Interface 1 section, do one of the following:
- Use the Please select a Lumen Connection list to select a circuit ID for Lumen connection, then select the type of connection you want to use. (Lumen Connect only shows Lumen-provided MPLS and Lumen® Dedicated Internet Access circuits in the list. If the circuit is provided by someone other than Lumen or uses Lumen® Enterprise Wireless Access Service, click Can't find Circuit ID? Enter manually, then fill in the information for the circuit using the instructions below.)
- If the circuit ID isn't listed, click Can't find Circuit ID? Enter manually, then fill in the information for the circuit:
- Select the connection type: 1G Copper, 1G Fiber SMF, 1G Fiber MMF, 10G Fiber SMF, or 10G Fiber MMF.
- Select the circuit type: Lumen VPN, Lumen Internet, 3rd Party Internet, or 3rd Party MPLS. (If you're using a multi-service port, select Lumen VPN.)
- In the Access Provider field, select access provider for your circuit and verify the phone number. If you don't see the provider listed, select Other, then type the name of your provider and type the provider's phone number (if available).
- In the WAN Circuit ID field, type the provider's circuit ID (if available). If you don't know the circuit ID, type THIRD PARTY CIRCUIT.
- In the Addressing Method field, select whether this circuit has DHCP or static IP Addressing. If the circuit has static IP addressing, fill in the additional information for the circuit: select the subnet mask, type the gateway IP address, type the WAN IP address the device will use, and select No in the VLAN field. (For VLAN requirements in a multi-service port scenario, contact your Lumen SASE engineer.)
- Select the connection type: 1G Copper, 1G Fiber SMF, 1G Fiber MMF, 10G Fiber SMF, or 10G Fiber MMF.
- Use the Please select a Lumen Connection list to select a circuit ID for Lumen connection, then select the type of connection you want to use. (Lumen Connect only shows Lumen-provided MPLS and Lumen® Dedicated Internet Access circuits in the list. If the circuit is provided by someone other than Lumen or uses Lumen® Enterprise Wireless Access Service, click Can't find Circuit ID? Enter manually, then fill in the information for the circuit using the instructions below.)
Note: Lumen Connect only shows Lumen-provided MPLS and Lumen® Dedicated Internet Access circuits in the list. If the circuit is provided by someone other than Lumen or uses Lumen® Enterprise Wireless Access Service, click Can't find Circuit ID? Enter manually, then fill in the information for the circuit.
- If you have high-availability for the device, repeat step 13 for the failover device.
- If you want to configure another WAN port for the device (e.g., if you have dual WAN transports), click Configure another WAN port, then fill in the information for the secondary WAN.
- Repeat steps 13–15 as needed to add more WAN ports. When you're done, click Save & Continue.
Lumen Connect lists the LAN connection options.
- Use the arrows to select the type(s) and quantity of connections you need for your LAN. If you select a fiber connection, Lumen adds more SFPs (small form-factor pluggables) to the box when we ship the device(s). When you're done, click Save & Continue.
Lumen Connect shows the contacts for the node.
- In the Local Contact section, tell us who will receive the device at the local site. To change the contact, select another contact from the list or type the name, phone number, and email address for the content, then select their contact preference.
- In the Technical Contact section, do one of the following:
- If the technical contact is the same as the local contact, select Yes in the Same as Local Contact field.
- If the technical contact is different from the local contact
- In the Same as Local Contact field, select No.
- Select a contact from the list or type the name, phone number and email address for the technical contact.
- Select the contact preference for the technical contact.
- In the Same as Local Contact field, select No.
- If the technical contact is the same as the local contact, select Yes in the Same as Local Contact field.
- In the Shipping Contact section, do one of the following:
- If the shipping contact is the same as the local contact, select Yes in the Same as Local Contact field.
- If you want us to ship the device to someone other than the local contact
- In the Same as Local Contact field, select No.
- Select a contact from the list or type the name, phone number and email address for the shipping contact.
- Select the contact preference for the shipping contact.
- In the Same as Local Contact field, select No.
- If the shipping contact is the same as the local contact, select Yes in the Same as Local Contact field.
- When you're done, click Save & Continue.
Lumen Connect shows a summary of the information for the node.
- Review the information on the screen. If you need to change the information shown, click the icon next to the section you want to update, make your changes, then click Save & Continue. Then, click Save & Continue on successive steps to return to the summary.
- When you're done reviewing, click Deploy Node.
Lumen Connect starts configuring the node using the information you provided and places the node in Provisioning status. If you receive an error while deploying the node, cancel out of the node-configuration process and contact your Lumen representative for help. Once we ship the equipment, Lumen Connect changes the status to Shipped.



